 In our on-going quest to get just about everything for free, we’ve covered quite a few SIP and VoIP services and discussed some of the ways one can utilize them to place various kinds of free telephone calls. However, one thing that was clear at the time of writing our original VoIP post was that no single service offered everything that we were looking for. However, that was before we got our mitts on a Google Voice invite! (thanks, Sumant!). With Google’s proprietary Voice service (apparently they acquired the technology from a company called Grand Central) you can both make and receive calls (as well as SMS) to the USA and Canada for free. No joke! Calls to outside of North America will cost you, but the rates are almost negligible.
What else is cool about Google Voice? Well, you can opt to receive a unique Google Voice number with which you can connect up to six unique phones (and consequently, the ability to choose which phone you want to ring at any time). Users also have the added bonus of running the Google Voice App for Smart Phones which brings the calling power of Google Voice to your Cell Phone. Did I mention Voicemail? Yep, you get that too! You can make your own custom message just like a regular call answer service and you can even have the service transcribe voicemail messages to text and email them to your address of choice. Holy shitballs! Funny thing about that last feature... It seems the transcription process isn't without its quirks... In fact, at times it comes up with some pretty amusing transcription errors... so much so, that it's inspired a new website called shitgooglevoicesays.com. My personal favourite is the call from Pesto Pasta.


In many ways, Google Voice is the communication solution that many have been waiting for. But, while Google’s service certainly shines when compared to many other similar offerings, one huge issue with the service is the complete lack of support for Canadian users. Well, today I’m going to briefly discuss a way that my fellow Canadians can take advantage of Google Voice and (for the most part) use it just as American users can! While I’m on the subject, I’ve heard varying accounts of just why the service ironically lets users in the USA call Canada for free. Some say it’s purely Google taking their time to roll out the service, and others claim it’s because of the CRTC. I’m still on the fence, but I’m hoping it’s simply a case of the former, though I fear otherwise.
So! Let’s get down to business, shall we?
Step One: Obtain a Google Voice Invite
Amazing news! As of today, (June 22, 2010) Google Voice is open to the public! Invites are no longer required. Sign up here!
Step Two: Access and Configure Google Voice
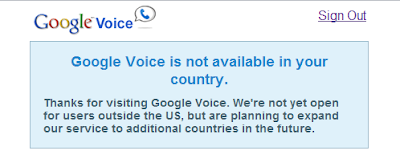
Now that you have your invite email, it’s time to sign up! If you’re in Canada and you try to access the sign up page you’ll see this:

The solution? Our old friend Hotspot Shield. However, you can use just about any proxy or VPN solution you wish, you just need to acquire an American IP address. Once you have Hotspot Shield up and running, you should be able to follow the link in your Google Voice invite and sign up without issue. While this is a bit of a work-around, the good news is that once you’ve signed up, Google will cool it with the IP filtering. Hotspot Shield is only needed this one time.
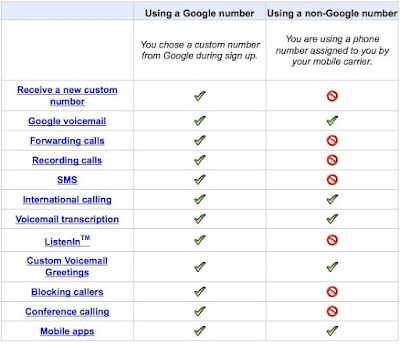
Below, you’ll find a graph outlining the difference between adding Google Voice to your existing number versus obtaining a new Google Voice number. I recommend the latter, simply because it offers more features. It really doesn’t make much difference what area code you choose for your Google Voice number, but you may want to consider grabbing an area code of someone you know in the USA; this way, they'll be able to reach you through a local number etc. Google Voice to Google Voice numbers are of course, always free.

Once you log into Google Voice, you’ll be faced with one final obstacle; you’ll need to add at least one phone in order to start making and receiving calls. The problem is, according to Google, it must be a USA number. This is where Step Three comes in.
Step Three: Register for a free account at Freephoneline.ca
Here’s the deal. Google Voice will basically reject any attempt to add a Canadian number as a forwarding phone. However, they left a loophole for those willing to go through a couple of extra steps to use the service. Google Voice will accept numbers in the (403) area code, which is, quite surprisingly, located in Alberta, Canada. See where this is going?
Register for a free account at Freephoneline.ca (remember them from our SIP phone post?), and request a number with a (403) area code. Once your Freephoneline account is active, log in, and add your actual phone number (or whatever number you want to make and receive calls with) to your “Forwarding” settings (yes, you can add more later, too).
Next, log back into your recently created Google Voice account and enter your new (403) number as your first forwarding phone. Google will then ask you to verify the number. If all goes well, your Freephoneline forwarding number should ring within a few seconds. Next, just use your phone’s keypad to enter the two digit code provided by Google, and voila! You’re all done!
Using freephoneline.ca, you should be able to add any additional phones you like to your Google Voice account. Remember, since all Google Voice calls are effectively incoming calls, you probably won’t get charged anything more than regular minutes on your cell as long as you’re in your native calling area. But seriously, don’t just take my word for it; make sure to check your cellular plan details to avoid any nasty surprises.
Congratulations, you can now use Google Voice with your own Canadian number! Awesome! Totally awesome!
Thanks to cpedley from the Google Voice forums for the last piece of the puzzle.
Labels: Canada, Google Voice


